Consultancy and Programming
Technical Pages
About Us

Advice, tips, techniques and downloads for Visual Foxpro developers.
Visual FoxPro forms have a Scrollbars property which lets the user scroll the form vertically and/or horizontally. At first glance, this looks like a useful feature. It means you can place a large number of controls on a form that wouldn't otherwise have room to display them. The problem is that most forms have controls that really need to be visible the whole time - a Close button, perhaps, or a navigation control. But scrollbars work on an all-or-nothing basis: you can only scroll the entire form, not just part of it. So you can never be sure which controls are visible and which can only be seen by scrolling.
It would be much more useful if you could create a scrollable region within a form. That way, you could let the user scroll an area containing one or more specific controls, while keeping other parts of the form stationary. As an example, imagine you want to display an image, but you don't know the image's size at design time? Rather than designing the form to accommodate the largest possible picture, it would be nice if you could place the image in a scrolling region. The user could then scroll the picture when necessary, but without affecting the other controls on the form.
In this article, we'll explain how to do that. This technique requires only a little code, and does not rely on Windows API calls or ActiveX controls. (Our thanks to Bernard Bout and Fernando Bozzo for some of the ideas we describe in this article.) The main limitation of this technique is that doesn't work with modal forms.
We originally developed the technique for our custom report viewer form (which is described in the Foxstuff article, Taming the VFP report preview window). However, to keep the explanation simple, we'll describe here how to use it to create a simple form with a scrollable image and label. Of course, you can adapt the technique for any kind of form you like.
The first step is to create a separate form class to represent the scrolling region. Go to the Visual FoxPro class designer, and create a new class based on a form class. We'll call the class ScrollForm. Set its TitleBar to 0, its ScrollBars to 3, and its BorderStyle to either 0 or 1 (1 if you want the scrolling region to have a border, 0 otherwise).
Next, add whatever controls you want to appear in the scrolling region. For this example, we'll add an image and a label. You can arrange these in any way you like, and set their properties to whatever is appropriate. For example, you'll probably set the image's Stretch property to 1 (isometric). Figure 1 shows how this might look in the class designer.
When you've finished, save the class and close the designer.
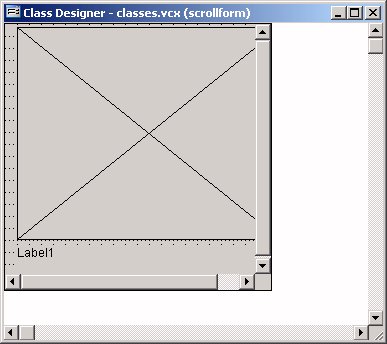
Figure 1: The form class that will be used as the scrolling region.
Now let's turn to the main form, that is, the one that will hold the scrolling region. You can use either an SCX-based form (created in the form designer) or a form class for this. Either way, go ahead and create the form using the appropriate design tool, or open an existing form if you prefer.
Next, add a shape to the form. This is not strictly necessary. Its main purpose is to provide a guide to the size and position of the scrolling region. For this example, we'll name the shape Guider. Arrange it so that it has the size and position that you initially want for the scrolling region. Set its Visible property to .F. You don't have to worry about its other properties, as it will remain invisible the whole time.
Now add any further controls that the form needs. These controls will appear outside the scrolling region.
The next step is to add the ScrollForm class that we created earlier. At this point, you're probably thinking that this is impossible. After all, ScrollForm is a form, and you can't add one form to another - and least, not visually. If you tried, VFP would assume that you wanted to create a formset, which is definitely not the case.
However, it turns out that you can add one form to another programmatically, using a bit of syntax borrowed from FoxPro 2.x. To do so, execute this code from the Init of your main form:
LOCAL loForm
loForm = NEWOBJECT("ScrollForm", "Classes.VCX")
* Classes.VCX is the library holding ScrollForm
THISFORM.ADDPROPERTY("oScroll", loForm)
SHOW WINDOW (THISFORM.oScroll.Name) IN WINDOW (THISFORM.Name)
What we're doing here is creating a property of the main form which is then used to hold an object reference to an instance of the scrolling form. We then display that instance as a child form of the parent (main) form.
We now need to make sure the scroller is positioned correctly within the main form. This is where our guide shape comes in. All you need is some code that sets the scroller's Top, Left, Height and Width properties to match those of the shape. This is easy to do, because you already have an object reference to the scroller (THISFORM.oScroll).
So add a custom method to the main form (call it, say, SetSize), and add this code to it:
WITH ThisForm.oScroll
  .Top = ThisForm.Guider.Top
  .Left = ThisForm.Guider.Left
  .Height = ThisForm.Guider.Height
  .Width = ThisForm.Guider.Width
ENDWITH
Then call the SetSize method from the main form's Init, immediately after the SHOW WINDOW command shown above.
The next task is to make sure the scroller behaves properly when the main form is resized. If you're using VFP 9.0, simply set the guide shape's Anchor property to 15 (so that it resizes horizontally and vertically). Then call the SetSize method from the main form's Resize event. That way, the scroller will continue to occupy the size and position of the shape.
If you're using VFP 8.0 or below, the Anchor property won't be available, so SetSize will have to explicitly set the dimensions of the scroller relative to the main form (in which case, you won't need the shape). The following code arranges the scroller so that there's a gap of 25 pixels between it and the left, top and right edges of the form, and a 75-pixels gap at the bottom of the form (to accommodate some buttons, perhaps):
WITH ThisForm.oScroll
  .Top = ThisForm.Top - 25
  .Left = ThisForm.Left - 25
  .Height = ThisForm.Height - 100
  .Width = ThisForm.Width - 50
ENDWITH
Finally, you need to populate the scrolling region with useful information. In this example, the scroller contains an image and a label. So add a button to the main form, and write code in its Click event to add a picture and some text to these controls. In practice, you might prompt the user for the picture's filename and location, and display some of the picture's property information in the caption of the label. To keep things simple, we'll hard-code that information here:
WITH thisform.oScroll
  .Image1.Picture = "MyPic.jpg"
  .Label1.Caption = ;
    "Taken with Canon Powershot A540. " + ;
    "Copyright 2007. All rights reserved."
ENDWITH
You can now go ahead and run the form. Figure 2 shows how this might initially appear. In this case, you don't see any scrollbars. That's because the form is large enough to display the entire image and its accompanying label. But if you make the form smaller, one or both scrollbars will appear, as shown in Figure 3. You can now scroll the image and label as necessary.
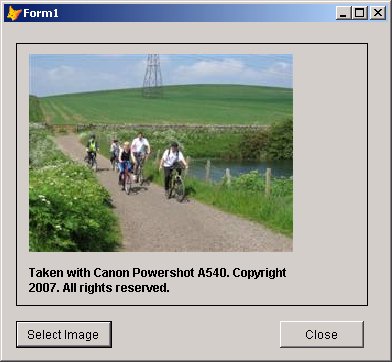
Figure 2: The form is big enough to show the scrolling region without the need for scrollbars.
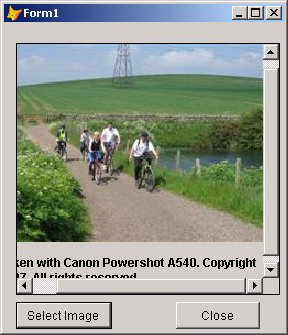
Figure 3: Here, the form is smaller, so the scrollbars appear.
For most purposes, the main form behaves just like any other form. But there are a few issues to keep in mind. Remember that the scroller is itself a form, and therefore fires all the normal form events, such as Load, Unload, QueryUnload and various data environment events. When you load the main form, it fires its own Load, followed by the Inits of its contained controls, followed by its own Init. This in turn instantiates the scroller, which then goes through that same sequence. So the scroller's Load and Init fire after the main form's Init has started but before it’s finished, which is not the normal behaviour of a contained control.
On closing the main form, it fires its QueryUnload. This is followed by the scroller's QueryUnload and Destroy, then the Destroy of its contained controls, and then its Unload. Then comes the Destroy of the main form's contained controls, and finally the main form's Unload.
When you click inside the scroller, its Activate fires (as you would expect), but the main form's Deactivate also fires (which is probably not what you expect). The opposite happens when you click back on the main form: the main form's Activate fires, followed by the scroller's Deactivate. When you use the scrollbars, the scroller's Moved and Scrolled events fire, but not its Activate, nor the main form's Deactivate.
Keep in mind too that you can't tab from the main form to the scroller. And if the scroller contains a control that can receive focus, and you click on that control, you can't then tab back to the main form. Also, if you have a standard Window menu in your application, the scroller will appear as a separate item in the window list - again, not something you would expect.
Another issue to keep in mind is the use of CTRL+F4. As you probably know, this key combination is used within Windows to close the current form or document. If the user happens to press CTRL+F4 while the scroller is active, the scroller will close, but the main form will remain open. The main form will then have lost its reference to the scroller, so any attempt to access its properties or methods will generate an error.
You might think that you could work round this problem by trapping CTRL+F4 in the scroller's Keypress event. Unfortunately, this is one of the few key combinations that Windows doesn't pass to the Keypress. However, you can trap it with ON KEY LABEL. The workaround is therefore to place the following code in the scroller's Activate event:
ON KEY LABEL CTRL+F4 *
and this code in its Deactivate:
ON KEY LABEL CTRL+F4
This will have the effect of disabling CTRL+F4 while focus is in the scroller. It doesn't affect the use of that key combination in the main form.
As we mentioned at the beginning of the article, the technique we've described here only works for modeless forms. If the main form is modal (that is, its WindowType is 1), the scroller will not become visible. You can force it to appear by setting its own WindowType to 1 after you have executed the SHOW WINDOW ... IN WINDOW command, but the main form will still be modal, so the scroller will be unable to receive focus. That means, for example, that the user won't be able to use the scrollbars, which defeats the object of a scrollable region.
If you can live with the fact that the main form must always be modeless, the other issues mentioned here are relatively easy to deal with, provided you're aware of them. These issues apart, creating a form with a scrolling region is fairly straightforward. It might not be something you need to do very often, but when you do need it, it can provide a user interface feature that would be hard to achieve in any other way. Give it a try.
Mike Lewis Consultants Ltd. November 2007.
FoxStuff is maintained by Mike Lewis Consultants Ltd. as a service to the VFP community. Feel free to download and use any code or components, and to pass around copies of the articles (but please do not remove our copyright notices or disclaimers).
The information given on this site has been carefully checked and is believed to be correct, but no legal liability can be accepted for its use. Do not use code, components or techniques unless you are satisfied that they will work correctly in your applications.
© Copyright Mike Lewis Consultants Ltd.